One of the really great things about this new digital technology is that photos may be manipulated. Parts may be cut out of different photos and then rearranged to make something completely different from the originals. Most of the photo/graphics programs will let you do this. I have used a number of different graphics programs from Photoshop to Adobe Illustrator, but my absolute favourite is Paintshop Pro Version 6.
Why do I say this?
Because it was user friendly and was very easy to learn. Later versions were not as user friendly, I know because I have all of the versions of Paintshop Pro, from 1 to 10, the last version created by JASC. JASC sold out to Corel so all versions after 10 are Corel products and I haven't bothered with them.
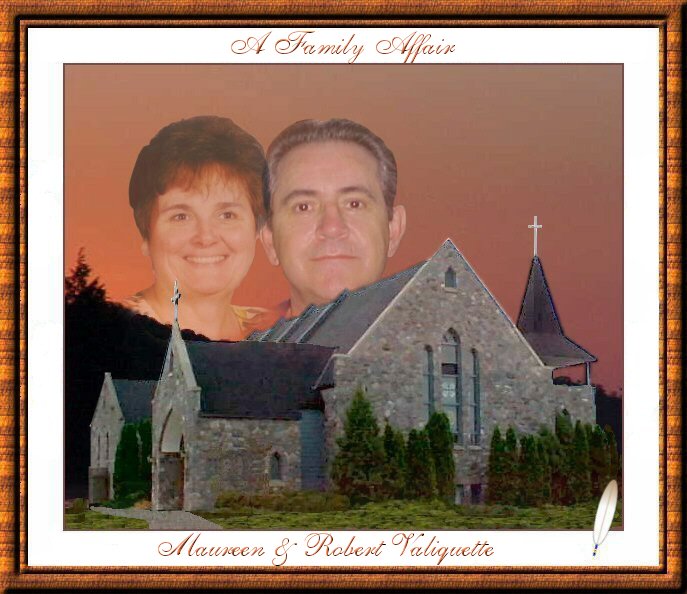
So for the first posting to this forum let me start with a photo creation, made up of four different photos. It was my very first try at photo manipulations and although I have really improved my skills at photo manipulation, this still remains my favourite.
The background, trees and red sky, are from a photo taken at the lake at sundown.
The church is Holy Name of Jesus Catholic Church in North Bay, Ontario, Canada. Maureen and I have been members of the congregation since we moved to North Bay in 1986.
The photo of Maureen is from one of the School Photos. She gets one every year.
And the last photo is one of me taken at the lake on the back deck of the Eaglenest.
Once I had selected the photos I wanted to use I had to remove the parts from each photo that I wanted. This is accomplished by using the selection tool, (Rope) to outline the part I want, then saving it, then pasting it as a new image. For example once I had selected the church and pasted it as a new image all of the background from the original photo was now gone and I had the church isolated. I did the same thing for the photos of Maureen and I.
Once that was done it was now possible to start assembling the various pieces to make a new image.
First the photo containing the background was loaded.
Then a new layer was created and the cut out of the church was placed on this layer.
Then another new layer was created and Maureen's photo was placed on this layer.
Then another new layer was created and my photo was placed on this layer.
So now I have a photo of the lake at sunset with three layers on top of it.
It is now a simple matter to go to each layer and move the object on that layer around until it is in the position you want.
When merging some objects from one photo into another, you may want to vary the opacity of one or more of the objects to get the kind of feeling you want. Iin order to give our heads a bit of a surreal look, the opacity of two those images was reduced. This opacity can be seen by look to the point where Maureen's head and mine touch.
Ok, now once all of the objects on each layer are positioned, and you are happy with the results, one simply merges all of the layers into one.
However, just placing various parts of different photos on top of another photo is not the end. One must now blend all of the edges of each of those added photos so they blend into the background. This may be done before merging, but I prefer to do it after merging so that I get a fairly good blending of the colours to give a seamless affect. Of course, there will be those that say that hasn't happened in this particular image and I agree, but it was my first go at trying something like this so there were bound to be some slight mistakes.
In any case, if anyone would like to discuss photo manipulation by all means post away. I sure would like to see what others are doing with photos.